"Tips" is a chronicle of compiled issues confronted during the course of my 45-year career in the sewing industry. These problems occur around the world and each customer will find a story describing their experience herein. This is a work in progress. Please contribute. Sewing machine customers call daily seeking solutions to problems and wanting pricing information for repair services. In some cases, re-threading the machine may solve the problem. The instruction book may not provide a detailed explanation for threading so we have attempted to provide one. The concepts are universal. Let us know if it helps!
Have a problem? email: napasewandvac@gmail.com, call 707.224.2922, or submit your questions using the form at the bottom of this page.
- Sewing Machine Tune-ups
- Threading Your Sewing Machine.
- Bobbin Case and Hook Race Maintenance.
- Threading your bobbin case.
- Threading Your 4/thread Serger.
- Rolling a Hem with a Serger.
- Why threading is a problem?
- Thread snarled up under your seam?
- Tension problems?
- Pfaff Tension Problems.
- Using Top Stitching Thread.
- Bernina Short Shank Adapters.
- New Commercial Sewing Machine Motors.
- Dripping Steam Generator Iron?
- Self Threading Sewing Machine Needles.
- Sewing Machine Needles and Needle Systems.
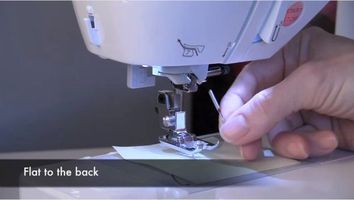
- Inserting the Needle.
- Janome Accessory Videos
- Singer Featherweight Trouble Shooting.
Sewing Machine Tune-Ups: $129.95-$249.95 (90 day warranty)
Service includes complete diagnostics, delinting, air cleaning, inspection and adjustment of all thread and fabric handling mechanisms, upper and lower tension adjustments, belt, bobbin winder and clutch adjustments, oil, lubrication and electrical inspection. If additional repair is required, a detailed estimate will be prepared for no extra charge. You can spend the money on servicing or you can do it yourself.
Threading Your Sewing Machine - by Russell Moore
Make sure the needle is inserted properly. The operator should follow the threading sequence carefully to ensure the threading path is exactly correct.
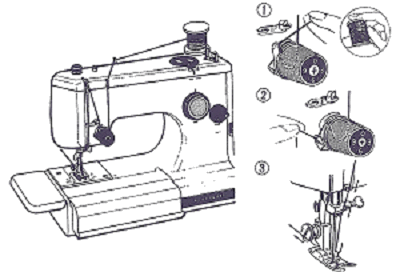
1. Mount the thread on the spool pin so the thread can be delivered without a snag. On a horizontal thread delivery system, make sure you use the correct thread cap for the size spool you're using. For vertical spool pins, make sure your thread spool spins evenly and that the thread doesn't drop down around the spool pin.
2. Once the thread spool is mounted properly, raise the presser foot lifter lever and lock the presser foot in the up position. This allows your tension to relax so that you may seat the thread easily between the tension disc and bury the thread to the tension post, insuring your thread is embedded properly into the top tension assembly. Holding the spool with your right hand will keep the thread tight as you drag the thread through the thread path. Using your left hand to thread, pull the thread from the spool to the first thread guide and continue with your left hand pulling the thread down into the tension, pulling up to the catch the take-up spring, then over the top and through the take-up lever. When learned, this is done in one fluid motion. At this point, pull the thread with your left hand, observing no resistance to the thread as you drag it from the take-up lever. Lower the presser bar and pull the thread and feel the resistance resulting from the tension engaging. Understand that the presser bar lifter lever contains the tension release linkage. This little piece of engineering enables you to remove the fabric from underneath the presser foot without breaking the thread. Now, turn the tension dial from zero to nine and feel the differences. The higher the number the greater the resistance. This is important to understand, as later, when using different weights of thread, you'll use this knowledge to set your tension to achieve a proper top stitch and a well defined bobbin or under stitch.
3. After completing this tension test, you will take the thread from the take-up lever to next guide and then to the needle clamp thread guide. At this point, lower the presser foot, giving your fingers more room around the needle and thread the eye. Pull five or six inches of loose thread from the needle. (Of course, you wouldn't be doing this if your machine had a built-in needle threader.) This will insure you have enough thread to prevent the needle from unthreading itself providing the take-up lever is not in it highest position. Drop your bobbin in place and pull the bobbin thread through its' tension slot. With your left hand holding the needle thread, the foot still down, rotate the hand wheel toward you from the top until the take-up lever reaches its highest position. Pulling the needle thread will lift the bobbin thread through the needle plate. Raise your presser foot and draw the bobbin thread to the surface, placing it with the needle thread to the right or rear under the presser foot. This will allow you to see and control the thread tales as you lower the presser foot onto the fabric to begin your seam. Rotate the hand wheel from the top towards you, making a stitch to insure your not breaking anything. Do not turn the hand wheel backward! This is a definite no-no at any time! Making your first stitch manually, you can be confident your machine will sew as expected. If not, at least you've tried everything possible. Now, you can make plans for a shop visit. A sewing machine service, including a thorough head cleaning, may produce the needed repair plus surprisingly improve the machine's performance. - END
Bobbin Case and Hook Race Maintenance:
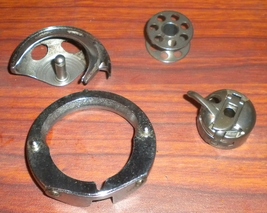
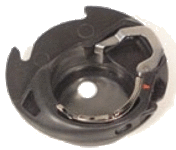
The hook and the hook driver fit together like two pieces of a puzzle. Rotate the hand wheel until the driver is on the left. Hold the hook spindle with your right hand and place it into the hook race adjacent to the hook driver. This is easier to do with the head tilted back slightly, making it easier to see when positioning the hook and also provides stability so the hook doesn't fall out. At this point, you can install the hook cover, using the keyway at the bottom of the cover to position it properly. Lock the cover in place using the latches on either side of the hook base.
Note: Eddie is an old friend of mine. In the early 80's he worked part time for me as a mechanic. Eddie is Swiss and a Bernina trained machinist. During the late 70's and early 80's, Eddie worked for Bob Ritterhoff, the California Bernina Distributor. Eddie traveled with Bernina as a Technical trainer and was instrumental in training many Bernina repair personnel in California, including myself. Eddie is an excellent salesman, selling hundreds of Bernina sewing machines on the Fair circuit. Eddie worked my first Bernina fair in Napa, the summer of 1979, and sold more Berninas in 3 days than the previous dealer sold in one year. Study his maintenance video. It's a valuable tool when servicing machines and training customers. Second, is a Janome Rotary maintenance video. Note: the tweezer tips are covered using a piece of wire insulation. Cut and paste the url in your browser to view Eddies video: http://www.newhomesewingcenter.com/service.html.
Threading your Bobbin Case - by Russell Moore
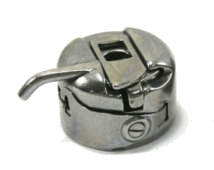
15 Class"Rule of Thumb": The are two ways to install the bobbin. Either way may work but much like the "toilet paper installation dilemma", inside or outside, I am proposing the proper way. The toilet paper roll should be installed with the paper dispensed from the inside, closest to the wall. The reason for this is that the cat cannot leap and spin the paper off the roll. As for the bobbin, the bobbin should be placed in the case so that when the bobbin thread is drawn from the bobbin case spring the bobbin will be turning clockwise. This installation reduces the possibility of "bobbin backlash", a result where the bobbin thread tangles in the case. It also makes drawing the thread into the tension slot much easier. If the bobbin does not turn clockwise, turn the bobbin over and reinstall using these instructions. Janome"Top Drop-in Rotary Hook Bobbin Cases": This is the bobbin case used in all of the new Janome Rotary hook machines. Many other manufacturers use similar bobbin cases. Drop the bobbin into the case, holding the bobbin stationary with one hand while pulling the thread into the tension slot will the other. Pulling the bobbin thread through the tension spring will turn the bobbin counter clockwise. A bobbin installed using this technique makes threading the bobbin case tension spring much easier. If the bobbin does not turn counter clockwise, turn it over and reinstall.
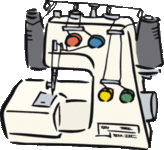
Threading Your 4/thread Serger
1. Don’t be too thrifty. Install new needles, using size 14/90 or smaller! Your needle should be changed each garment. Arm yourself with a good set of serger tweezers!
2. Install serger cone thread on your thread tree and use the stabilizers that come with your machine (those are the little cone shaped things that fit over your spool pins)
3. Make sure the presser foot is up so that your tension release will do its job. If you have no tension release, follow these instructions carefully.
4. You are going to thread your upper looper first, then the lower looper, your right needle and then the left needle. (Some use “over looper” and” under looper” nomenclature.)
5. Upper Looper: Drag the thread from the third spool, to the thread tree guide, down to your first machine thread guide just before the tension module. When pulling the thread through the tension disc, hold the thread spool end of the thread with your right hand and with your left hand slide the thread between the disc or into the tension assembly and through the next thread guide. At this point, pull the thread slightly and turn the tension dial to a higher number to see if you can feel the tension increase or decrease as you turn it to a lower number. (If you have a tension release, you may have to lower the presser foot to engage the tension.) This is how you check to see if your tension is threaded properly.
6. Continue threading, using your tweezers as needed, according to your threading diagram, making sure to thread each thread guide in the thread path. Missing one guide can cost you and the sequence is essential!
7. Thread through the eye of the upper looper and let the thread lie free. Do not try to put this thread under the presser foot or anywhere on the bed surface.
8. Lower Looper: Thread your lower looper using the same strategy.
9. Needles: Thread your right needle first, using the guides on the right side of the needle holder. Lowering the presser foot will give you more room to maneuver around the needle eye. Use your tweezers when threading the eye of the needle. With some models, swinging the upper cutter out of the way can be helpful!
10. Thread the left needle. Make sure you have ample length of thread from the needle to drag under the presser foot and to the rear.
11. Place you fabric under the foot along side the upper knife and lower the presser bar. Hold the two needle threads with your left hand, but do not pull them (one if you’re using a 3/thread overlock or rolling a hem). Rotate the hand wheel by hand to make your first stitch. If you feel confident that you’ve threaded correctly, step on the foot control and begin serging. The thread tails can be trimmed when you’ve completed the seam or earlier if you’re wanting to be neat. Do not pull your fabric. Adjust your stitch length to a longer stitch if you want the fabric to move faster.
12. Once you’ve establish your “stitch chain”, you can begin sewing another piece by simply raising the presser foot “toe” and sliding the material into the cutter. Do not attempt to pull the thread from the rear, as once the “knitting” process has begun, you will not be able to pull the thread from the needle eye.
13. Trouble shooting: Use this as the "Rule of Thumb": If you break your lower looper thread, unthread your needles before rethreading the lower looper. The needle threads wrap around the lower looper and should you re-thread the looper only, you may trap the needle threads and the result will be thread lock, broken needles, a broken needle plate or a broken lower looper.
Serger basics video: https://youtu.be/l8TUwNRgSXc
Rolling a Hem with your Serger - by Russell Moore
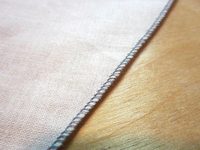
A rolled hem Is easy! Use the right needle only. Remove or withdraw the stitch finger. Adjust the cutting width to suit your desired result. Moving the cutter to the right will leave more fabric to roll. This will add dimension and texture to your rolled hem. Lower upper looper thread tension from 3 to 2. Increase the lower looper tension until you achieve the appearance you want. Increase the needle tension if needed. What is going on? The lower looper is pulling the thread to the backside of the seam. Increasing the needle thread tension will pull the lower looper thread to align under the needle thread. Lowering the upper looper tension will allow the lower looper to pull the thread directly under the needle thread. The upper looper thread is wrapping the edge. All three threads should meet directly under the needle to produce a sweet rolled hem. - END
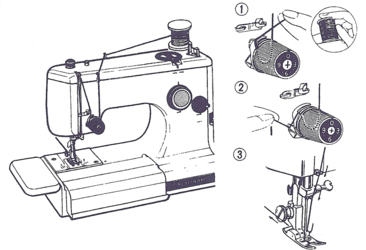
Why Threading? Is threading the solution to your problem? - by Russell Moore
Misthreading is a problem encountered by novice and experienced operators alike. I myself, intermittently, misthread a machine and confront the same results as you will. I've been threading multiple machines daily for nearly forty years and repairing them for as long. I have a standard test for threading accuracy and implement it each time I thread a machine. It's a useful tool that gives me confidence each time I start a seam. You're using a threading technique that been working for time after time without any incident or mishap. Most operators learn the threading path sequence and thread the machine rather routinely without considering the components. It can be compared to flipping a lights switch to turn on the lights or turning the faucet handle to get water. You don't need to know how electricity is produced if you understand that flipping the switch gives you light. However, if it doesn't work? "If at first you don't succeed, try try again." This leads to frustration. That's why I am encouraging you to develop a foolproof technique. The best way to do this is to get acquainted with the thread handling components and the principles of how they work. You'll learn the sewing machine nomenclature so you'll be able to relate to my instructions.
Customers call daily complaining about machine performance. Some have rethreaded several times but they're making the same mistake over and over again. You will benefit by studying how the tension works, how the tension release linkage works, how the take up spring contributes, what the take up lever does, what the presser foot lifter lever has to do with it and how to insert the needle properly and why, how the hook works and how the bobbin case tension works. These are the basic thread handling elements. The basic principles of threading revolves around these components. Solve threading problems permanently by learning the principles of how your thread handling mechanisms work, how the machine forms a stitch and how inserting the needle plays a vital role.
The threading path is a circuit that's designed to feed thread to the hook. The hook picks the thread from the needle and drags it around the bobbin case. The volume of thread needed for this trip around the bobbin case comes from the take up lever. At the end of the hook rotation, the hook is releasing the thread and the take up lever is pulling the excess thread tight to form the stitch. If the thread tension is not engaging the thread, the take up lever will pull additional excess thread from the spool, thus leaving excess thread under the seam that has not been recovered. The take up lever needs the tension to hold the thread tight while it's recovering the thread loop that's been dispersed to make the circuit around the hook. You can observe this process by opening the bobbin case cover while turning the hand wheel by hand. You will see the thread travel around the bobbin case and observe the relationship of the take up lever motion in this thread handling process.
An essential component of this process is the top tension assembly. The tension module has a spring pressing into the tension disc. The pressure on this spring is released when you lift the presser foot lifter lever. Lifting the foot releases the tension on the thread allowing the operator to pull the fabric freely from under the foot without breaking the thread at the eye of the needle. This mechanism is called the tension release linkage and is instrumental when threading. The thread is easily pulled into the tension with the presser foot up. The threading is difficult with the presser foot down unless the thread is pulled intentionally into the tension disc all the way to the tension post. I recommending you always thread the tension module with the presser foot up. You can test threading by lowering the foot and pulling it from the tension. The thread pulls hard when the foot is down, pulls easily with the presser foot up.
Thread snarled up under your seam? - by Russell Moore
Customer’s call regularly complaining about thread and fabric being stuck and/or jammed into the needle plate hole. Before throwing out the baby with the bath water, let’s resolve the jam by removing the fabric. First, depending on the type of bobbin case your machine uses: in the case of a 15 Class hook system (one with the bobbin case you install into the hook through a little compartment door in front of the machine), you’ll want to remove the bobbin case, hook cover and hook. These pieces go back together like pieces of a puzzle and you’ll need to perform this operation when oiling your machine too. Removing the needle plate may be necessary if you want to remove the fabric without damaging it.
"Birds nest" results from no top tension. The hook pulls the thread from the Take Up Lever and wraps it around the bobbin case. The Take Up Lever pulls the thread back from around the hook to create a stitch. If there is no top tension, the Take Up Lever will pull the thread from the spool and leave the residual thread from the Take Up Lever under the fabric. The reason is the fabric offers more resistance than the spool.
With a top loading bobbin, first trim your threads, raise and remove the presser foot, remove the needle plate, and this should give you access for removing the fabric and removing any thread lock.
Most common thread lock can be eliminated by turning the hand wheel backward. Try this first. Top loading plastic bobbin cases can be damaged by a thread lock. Resulting burrs and needle punctures will result in thread handling problems and infinite frustration. See your local dealer for a solution.

Tension problems? - by Russell Moore
We get calls daily from operators disgusted with their sewing machines, swearing up and down they have tension problems. 9 times out of 10 they do have tension problems, but their sewing machine doesn't. I always ask “what kind of results are you getting” or “what is the quality of the stitch”. “Does the stitch loop under the seam” or “are their long loops on the bobbin side of the seam?” We generally suggest, before throwing the machine out of the window, rethread the machine making sure the presser foot is up. The tension assembly opens with the presser ft up, making threading the tension easier. The tension release mechanism is designed to disengage when lifting the foot, thereby relieving the thread tension. Removing the fabric from underneath the presser foot is done without breaking the thread at the needle eye. Threading the machine with the presser foot down means threading into tension disc that are closed. This can often result in no top tension, the top thread travels around the bobbin case and not pulling back up with the stroke of the take-up lever. Visit your local sew and vac dealer. Tell him what your symptoms are before requesting a repair. You may get a quick in and out charge and a valuable sewing lesson rather that a fat repair bill!
Real case scenario:
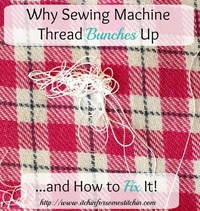
Customer: I was trying to hem some pants with my Janome machine yesterday and ran into a problem I've had on and off in the past. The thread starts to bunch up on the bottom of the stitch, making a mess I have to pull out and cut away. About a third of the time it works satisfactorily.
Answer: I think you threading path through the top tension needs tweaking. Thread with your presser foot up. Holding the thread spool with your right hand, pull the thread along the threading path with your left hand through the thread guides, into the tension, then over the take-up lever. Take your right hand to lower the presser foot. Pull the thread with your left hand to test for resistance. Raise the foot to check for resistance relief. When you draw the thread into the tension, your testing for tension. If there is tension on the thread with the presser foot down, and none when the presser foot is up, you know your tension is threaded properly. Loops form under the seam if there is no top tension. The take up lever delivers slack so the thread will travel around the bobbin case. The take up lever pulls up the slack to form the stitch. If there's no tension, the take up lever pulls more thread from the spool and leaves slack thread deposits under the seam in the form of loops.
It is not a problem with the bobbin, a common misunderstanding. Drop the bobbin into the bobbin case. Thread the bobbin case tension spring. When you pull the thread, the bobbin will turn clockwise.
Pfaff Tension Problems - by Russell Moore
The Pfaff 230 has a unique top tension module. It was developed in the 50’s with a completely different tension compression system that the common Singer 15/91 system using a coil spring. The Pfaff tension completely conceals the mechanism and unless taken completely apart, the problem will be concealed as well. Tension failure is most often caused by a clump of thread remnants lodged between the tension discs. The pressure spring attempts to compress the disc around the thread but the clump of thread is wedged between the discs and prevents the walls of the discs from closing around the thread. Without compression, the thread has no tension and pull easily through tension regardless of where the dial is set. This happens with other tension mechanisms but they’re much easier to diagnose because the tension discs are much easier to spread. Generally a mechanic will spread the disc and shoot a stream of compressed air into the mechanism to remove thread remnants. This is not so easy to do with the Pfaff 230 because the design conceals the mechanism.
Pfaff machines from the late 70’s, like the 1027 Tipmatic, 1400 srs and 7500 series have “lay-in” threading. The tension is concealed and can collect remnants of thread producing the same problem. \The clump of thread prevents the tension from closing around the thread, the clump wanders as the thread pulls through the tension and intermittent problems are experience until the clump is lodged in a position to permanently foil tension performance. Once again, lifter the presser foot an shooting a stream of compressed air into the tension may “blow it out”. I that doesn't work, the tension module can be removed for cleaning.
The other problem we’re having with the 1400 series revolves around old oil that’s coagulated into a stiff gummy tarnish. The results are presser feet with no pressure and bobbin winders that won’t disengage the hand wheel from the needle bar when winding the bobbin. These machines require a thorough detergent head cleaning.
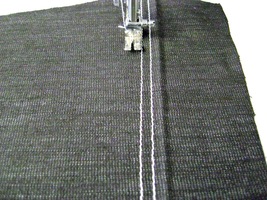
Using Top Stitching Thread - by Russell Moore
Eventually every machine operator wants to use heavy duty thread to mend denim jeans or make some upholstery project. Nylon upholstery thread size 69 is a popular choice for upholstery and top stitching thread is a viable alternative. Polyester Mettler Top Stitching thread is commonly available and is available in a plethora of colors. A rule of thumb is to use a needle with a large enough eye so that the thread will travel through the eye without too much friction. "Too Much" is the operative word. Buy top stitching needles for household type machines. These needles have a much longer eye and the larger sizes have even bigger eyes. Top Stitching thread is much thicker, therefore the top tension will produce more drag at an average tension setting, say 4-5 on your tension dial. Knowing this, the same logic can be applied to the bobbin case tension. Top Stitching thread is generally used on "top" with standard sewing weight thread on the bobbin. There is little concern for balancing the tension because all we need is a good looking "top stitch". On the other hand, when using top stitching thread on the bobbin, we are looking for stitch definition on both sides of the seam. Now, using our "top tension logic", we know the bobbin case tension will be producing more drag too. Because bobbin case thread tension is normally negligible, meaning very little, we need to adjust the bobbin case thread tension accordingly. There are two screws that are connected to the bobbin case tension spring. The one at the tail end of the spring is the "anchor spring". It has no influence on the thread tension but it does hold the spring in place. Do not turn this screw! The other screw is the tension spring pressure adjustment screw. Turning this screw counter clockwise will ease the pressure thus reducing the tension. Turn this screw 1/4 turn counter clockwise and sew test. If the desired stitch definition is not produced, turn the screw another 1/4 turn and sew again. You may have to repeat this one more time. I would not recommend more than 3/4 of a turn. We don't want this screw to fall out! If the bobbin side stitch definition is still not pronounced enough, turn the top tension up to 6,7 or even 8. Sew a seam on a sample patch of the project, checking the stitch quality at each tension setting. One of these settings will produce the results you're seeking.
Bernina short shank Adapters - by Russell Moore
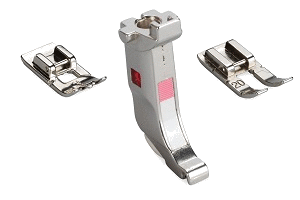
There is an adapter for each Bernina model enabling you to use standard short shank presser feet with your Bernina. The adapter attaches to your machine the same way your Bernina feet do. The presser bar then accepts a short shank foot holder so you can use Janome and other universal presser feet, rufflers, binders and a selection of options offered by Bernina.
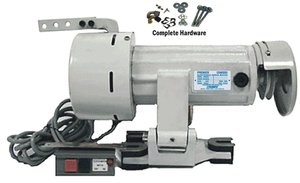
NEW COMMERCIAL MOTORS - by Russell Moore
The biggest complaint I've had regarding commercial machines always revolves around speed control. Especially the "take off" speed. Commercial Sewing Machine Motors have been redesigned to implement smoother speed control, quieter operations, and more efficient use of electricity. These new designs are called servo motors. I recommend you upgrade your commercial stand to include one of these new motors. Motors range in price from $150-$300. Bolting them up can be done with a crescent wrench or socket driver.
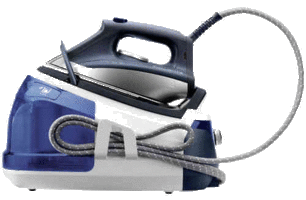
Dripping Steam Generator Iron? - by Russell Moore
The vapor supply line that connects to the iron is not heated and when cool will produce condensation. Attempting to implement the steam feature results in droplets of water. To avoid menacing droplets on you garment, try a dry run on an absorbent terry towel. This process heats the supply line and flushes unwanted condensation enabling the iron to deliver a smooth stream of hot vapor. Steam generator irons can be used with a cold sole plate, a definite advantage when producing sharp creases on gabardine slacks or when pressing silks and delicate synthetics.
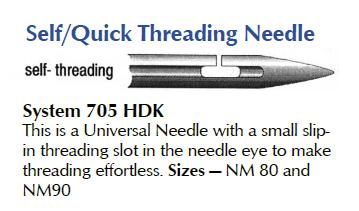
Self Threading Sewing Machine Needles
Schmetz packages self threading needles in 5/packs, sizes 12 and 14. We stock both sizes. My customer is anxious for others to know so I've added this tip to our list. This needle has a slot on the right side of the needle. Using both hands, slide the thread along the right edge of the needle and bingo, your threaded. I've never had a complaint about the needle coming unthreaded. Another innovation is the top stitching needle. The eye is much longer and much easier to thread. Top stitching needles are made for thicker threads, producing a bolder decorative top stitch. They're available in sizes 12,14 and 16.
Know your Sewing Machine Needles and Needle Systems
- All* straight stitch commercial machines use needle system: 231x16, 257x16 or DBx1. We stock this system in sizes 10, 12, 14, 16 and 18. The shank on this needle is slender and round.
- All* heavy duty upholstery machines use needle system 135x17. We stock them in sizes 14, 16, 18, 21, 22, 23 and 24.
- All* household sewing machines use needle system 705H or 15x1. They have a flat side on the shank. We stock them in many styles and sizes.
- There are many needle systems. Each is a description used by the manufacturer. If you inspect the package, you will see a group of needle system numbers, all synonymous. Your needle system will be listed in your owner's manual.
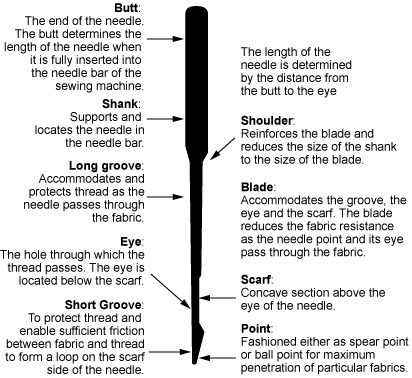
- Shank: The top part of the needle that goes into your machine. Home-sewing machine needles have a flat back that corresponds with the machine, so it's easy to fit the needle into the machine at the right angle.
- Shaft- The main part of the needle below the shank.
- Front groove-The slit on the front of the needle. This is where the thread sits while sewing which protects it from breaking.
- Scarf: The skinny space in the back of the needle that helps the machine not skip stitches. The scarf is actually longer on stretch needles to accommodate the fabric.
- Eye-Just like a hand-sewing needle, the eye is the hole where the thread goes. The difference is sewing machine needles is that the eye is on the opposite side of the needle.
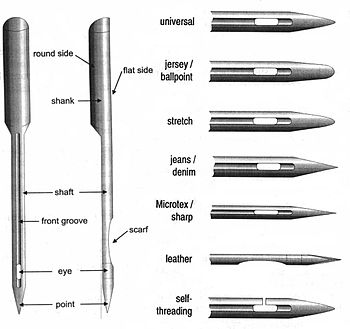
- Universal needles-Like the name says, it's universal and can be used for almost anything. The point is sharp with a little bit of rounding. It can't be seen with the naked eye, so I included a picture with examples.
- Ballpoint needles-The point is very round and is for knit fabric. When sewing with knit fabric, you don't want to pierce the fabric like you do with woven fabric. You want to push the yarns aside. If a yarn is broken in knit, it unravels.
- Stretch needles-Similar to a ballpoint needle, it just has a deeper scarf to prevent skipped stitches.
- Sharp needles-Sharper than a universal, this needle is used for wovens, fast straight-stitch sewing (like quilting), and topstitching. It makes a clean stitch because it is so sharp.
- Jean needles-Thick, sharp needles to accommodate thick fabric.
- Leather needles-Sharp needles made specifically for sewing on leather. I have never actually sewn on leather, so I don't know much about it.
- Twin needles-Two needles connected at the top so it can be put in the machine as one. When sewing, the stitching on top is two parallel stitches with a zigzag on the bottom. The zigzag comes from the bobbin thread going back and forth between the two needles. There are also stretch twin needles for sewing on knits and jean twin needles for making that common double thread we see on jeans these days.

The European needle measurement is first, and the American needle measurement is second.
- Very lightweight - 70/10
- lightweight - 80/12
- medium weight - 90/14
- medium to heavy weight - 100/16
- heavy weight - 110/18
